![]()
CC-1 COMP CO2LD
COMPONENT / PARTS COOLER
INSTRUCTIONS
![]()
CC-1 COMP CO2LD
COMPONENT / PARTS COOLER
INSTRUCTIONS
A cylinder of liquid CO2 should be obtained from your local CO2 dealer. Specify the cylinder be equipped with a "syphon tube" or "dip tube" inside the cylinder so that liquid rather than vapor will be withdrawn. Cylinders of CO2 are available in various sizes. Choose a convenient size based on anticipated usage. 15-20 pounds of CO2 will provide approximately 30 minutes of continuous cooling. Under most conditions this size cylinder will supply the COMP CO2LD for over a day of on-and-off use. Secure the CO2 cylinder to a wall, bench, or other solid object to prevent it from accidentally tipping over.
The female nut on the end of the COMP CO2LD hose includes a washer that must be in place to make a good seal to the CO2 cylinder. Finger tighten the nut onto the cylinder fitting until contact is made. Tighten the nut 1/8 turn more using a wrench. Note: The COMP CO2LD connects directly to the CO2 cylinder. No regulator is used.
Always wear eye protection when using the COMP CO2LD. Never aim the COMP CO2LD at any person or object you do not intend to cool. Loose particles may be blown from the surface to be chilled and particles of dry ice can be propelled from the gun.
When ready to use the COMP CO2LD, release the lock, aim the COMP CO2LD tip at the object to be cooled at a distance of approximately 1-2". 5-10 seconds may be required to purge the line and begin to see snow appearing at the tip. Subsequent operations will require little or no purge time depending upon how long the COMP CO2LD has been sitting idle.
Parts are cooled very rapidly. Excess CO2 will cause more cooling than necessary and ambient air moisture will condense on the part being cooled. If relative humidity is high, it may be necessary to apply heat to dry out the part.
There are three interchangeable tubes to provide more or less CO2 volume and intensity. They are:
|
|
|
|
|
|
|
|
|
The COMP CO2LD comes with two additional interchangeable tips allowing you to select the desired spray pattern for each application. The following instructions should be followed when changing tips.
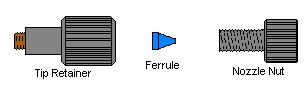
1. Ensure that the valve on the CO2 cylinder is turned off and that there is no pressure left in the hose by holding down the trigger until CO2 stops coming out. 2. Grip the tip retainer with one hand and the nozzle nut with the other and turn the nozzle nut counterclockwise. Continue turning until the nozzle nut is fully unscrewed from the tip retainer.
3. Remove the tip to be replaced from the tip retainer.
4. Remove the blue ferrule from the tip that is in the COMP CO2LD and place it on the tip to be inserted. Place the nozzle nut over the tip to be inserted, making sure that the flat end of the ferrule will be inserted into the tip retainer. Up to 1/2" of the tip can protrude past the flat end of the blue ferrule.
5. Tighten the nozzle nut down firmly. Do not leave loose or the tip that was inserted will be propelled out of the COMP CO2LD and could become a dangerous projectile.
6. Do not play with the CO2 snow. It is very cold (-109OF ) and can cause frostbite.
7. When not using the COMP CO2LD place the valve trigger mechanism in the "lock" position.
![]()

677 ANITA STREET, SUITE A, CHULA
VISTA, CALIFORNIA 91911
phone: 619/423-4555 toll free 800/379-4231 fax:
619/423-4604
Copyright 1998, Va-Tran Systems
Incorporated.